
nas-rockpi-penta.md 4.2 KB
% Configuration NAS Penta Rock Pi
Installation sur eMMC
On grave sur une carte SD une image correspondant à Rock Pi 4B plus
On boote dessus
On flash l'eMMC en utilisant ce tutoriel:
:::information
If you have no eMMC to μSD card converter board or you have ROCK 4A Plus or 4B Plus,
Install Debian Linux (or another Linux variant) first to microSD card following the microSD card installation page.
Insert both your microSD
Insert the (empty) eMMC module into the ROCK 4A, 4B, 4C, 4 SE, 4C Plus, for 4A Plus, 4B Plus, you have eMMC on the board already
Reboot it. It will boot from microSD
You can now use that Linux on ROCK 4 to download your desired OS from Rockpi4/downloads and install it onto the eMMC module. Example:
Verify that the system has booted from μSD, which should be /dev/mmcblk0p5 and that the eMMC module is found as /dev/mmcblk1:
$ dmesg | grep mmcblk
...
[...] EXT4-fs (mmcblk0p5): mounted filesystem with ordered data mode.

$ ls -l /dev/mmcblk1
brw-rw---- 1 root disk 179, 0 Jan  6 13:25 /dev/mmcblk1
Then write your downloaded OS image to eMMC:
$ sudo dd if=rockpi4_debian_stretch_lxde_armhf_20181105_2120-gpt.img of=/dev/mmcblk1 bs=1M
If you image downloaded is img.xz format, it's compressed, use
$ xzcat rockpi-4cplus-ubuntu-focal-server-arm64-20220520-1242-gpt.img.xz | sudo dd of=/dev/mmcblk1 bs=1M
A CLI tool to write an image with write diagnostics is pv:
$ sudo apt install pv
$ sudo pv -ptera < rockpi4_debian_stretch_lxde_armhf_20181105_2120-gpt.img | dd of=/dev/mmcblk1 bs=1M
Power off your ROCK 4, remove the μSD and power on again. The system will now boot from the on board eMMC or eMMC module.
:::
Configuration du réseau
D'après How to Configure Network Connection Using 'nmcli' Tool
État des lieux
sudo nmcli c
Donne:
NAME                UUID                                  TYPE      DEVICE
Wired connection 1  249328cb-11d9-364d-9e2d-0ef7ae271bd3  ethernet  end0
lo                  d86532c4-4ba9-4144-bb9b-7c1945180e2f  loopback  lo
ip a
1: lo: <LOOPBACK,UP,LOWER_UP> mtu 65536 qdisc noqueue state UNKNOWN group default qlen 1000
    link/loopback 00:00:00:00:00:00 brd 00:00:00:00:00:00
    inet 127.0.0.1/8 scope host lo
       valid_lft forever preferred_lft forever
    inet6 ::1/128 scope host noprefixroute
       valid_lft forever preferred_lft forever
2: end0: <BROADCAST,MULTICAST,UP,LOWER_UP> mtu 1500 qdisc mq state UP group default qlen 1000
    link/ether 76:80:df:60:56:74 brd ff:ff:ff:ff:ff:ff
    inet 192.168.0.202/24 brd 192.168.0.255 scope global dynamic noprefixroute end0
       valid_lft 7026sec preferred_lft 7026sec
    inet6 fe80::c968:5ddf:6b30:821f/64 scope link noprefixroute
       valid_lft forever preferred_lft forever
3: wlan0: <NO-CARRIER,BROADCAST,MULTICAST,UP,LOWER_UP> mtu 1500 qdisc pfifo_fast state DORMANT group default qlen 1000
    link/ether d4:9c:dd:a1:14:6a brd ff:ff:ff:ff:ff:ff
$ sudo nmcli dev status
DEVICE         TYPE      STATE                   CONNECTION
end0           ethernet  connected               Wired connection 1
lo             loopback  connected (externally)  lo
wlan0          wifi      disconnected            --
p2p-dev-wlan0  wifi-p2p  disconnected            --
Configuration
sudo nmcli connection add con-name connexion_filaire ifname end0 type ethernet
sudo nmcli con mod connexion_filaire ipv4.addresses 192.168.0.15/24
sudo nmcli con mod connexion_filaire ipv4.gateway 192.168.0.1
sudo nmcli con mod connexion_filaire ipv4.dns "192.168.0.1"
sudo nmcli con mod connexion_filaire ipv4.method manual
Mise en route:
:::warning
Attention: cela va déconnecter votre session SSH
:::
sudo nmcli con up connexion_filaire
Switch OTG
C'est le petit switch placé juste sous les ports USB3
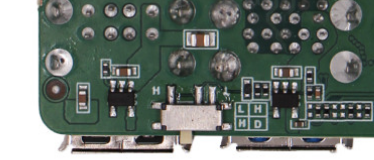
On le positionne vers la gauche pour activer le mode hôte et permettre la connection de périphériques supplémentaires.
https://wiki.radxa.com/Rockpi4/dev/usb-host-and-otg-switch-on-rock-pi-4